
India added 2.7 GW of new rooftop solar capacity in the first quarter of 2026 alone, a jump of 125% over the same period last year, according to Mercom India’s Q1 2026 market report. Behind every one of those installations sits the same question homeowners ask before signing a quotation: what does the solar panel installation process actually involve, and how long will it realistically take? If you have been comparing vendor quotes and hearing a different timeline from each one, this guide walks you through the complete solar panel installation process step by step, from the first site visit to the day your subsidy lands in your bank account. Our engineers follow this same sequence on every rooftop solar installation in Rajasthan we take on.
You will learn exactly what happens during the process of installation of solar panels, how the installation process for solar panels changes depending on whether you choose an on-grid, off-grid, or hybrid system, and what the full process for solar panel installation in India typically costs and takes in 2026.
Why the Solar Panel Installation Process Matters in 2026
Understanding the solar panel installation process before you sign a contract is not just about curiosity. A properly followed solar panel installation process protects your safety, your 25-year equipment warranty, and your eligibility for government subsidy under schemes like PM Surya Ghar Yojana. Vendors who skip steps in this process to finish faster often leave homeowners with rejected subsidy applications, delayed net metering, or panels that underperform within the first two years.
India’s Rooftop Solar Boom by the Numbers
The scale of India’s rooftop solar growth explains why so many households are searching for a reliable solar panel installation process right now. According to SolarQuarter’s coverage of the scheme’s progress, India had installed 9.56 GW of rooftop capacity under the PM Surya Ghar Muft Bijli Yojana by March 2026, working toward a target of one crore participating households. Residential rooftops accounted for 82% of all new rooftop solar additions in Q1 2026, with cumulative rooftop capacity crossing 23.5 GW by the end of March, led by Maharashtra, Uttar Pradesh, and Gujarat. That pace of adoption means more installers, more competition, and, unfortunately, more shortcuts being taken during the solar panel installation process by vendors who are not properly certified.
What a Correct Solar Panel Installation Process Protects You From
Skipping stages in the solar panel installation process rarely saves you money in the long run. A mounting structure installed without proper load calculations can fail during monsoon winds. Wiring done without surge protection devices can damage your inverter during a lightning strike. Most importantly, subsidy disbursement under PM Surya Ghar Yojana depends on using an MNRE-empanelled vendor and completing net metering correctly, so any shortcut in the documentation stage of the solar panel installation process can delay or forfeit your payout entirely.
The Installation Process Solar Panels Must Legally Follow in India
Beyond subsidy paperwork, the installation process solar panels go through in India is governed by real technical standards, not just vendor convention. Mounting structures must account for wind load under IS 875 guidelines, especially in coastal or high-wind regions. The Central Electricity Authority’s Rooftop Solar Regulations require earthing, surge protection, and cabling to meet defined safety codes, while panels and inverters sold in India must carry valid BIS certification. Systems above certain capacity thresholds, typically used in commercial or industrial projects, also require formal clearance from the Chief Electrical Inspector to Government (CEIG) before they can be energised. Knowing these requirements upfront helps you judge whether a vendor’s quotation reflects a compliant, safe solar panel installation process or simply the fastest one.
Not sure where your roof fits into the solar panel installation process? Fulminous Green Energy offers a free, no-obligation site survey before you commit to any vendor.
Book a Free Site SurveyTypes of Solar Systems and the Installation Process Solar Panels Follow
Before any technician sets foot on your roof, you need to decide which category of system fits your home, because this single decision reshapes several stages of the solar panel installation process that follow. The three broad categories are on-grid, off-grid, and hybrid systems, and each has a meaningfully different documentation and installation path within the wider solar panel installation process.
On-Grid Solar Systems
An on-grid, or grid-tied, system is the most common choice for Indian homes and the type covered under PM Surya Ghar Yojana. It connects directly to your local DISCOM’s grid without a battery, exporting surplus power during the day and drawing from the grid at night. Because there is no battery to size or install, the solar panel installation process for an on-grid setup is generally the fastest of the three, though it depends entirely on a successful net metering approval before the system can be switched on legally.
Off-Grid Solar Systems
Off-grid systems operate independently of the DISCOM network and rely on a battery bank to store energy for use after sunset. This route suits remote properties, farms, or areas with an unreliable or absent grid connection. The solar panel installation process for an off-grid system adds battery sizing, charge controller configuration, and battery room ventilation planning, but it skips the net metering application entirely since there is no grid interaction to register.
Hybrid Solar Systems
A hybrid system combines the best of both worlds: it stays connected to the grid like an on-grid system but also includes a battery for backup power during outages. Because a hybrid inverter has to manage grid power, battery power, and solar generation simultaneously, this is the most complex version of the solar panel installation process, generally taking longer for both the physical wiring stage and the DISCOM approval stage.
| System Type | Battery Required | Net Metering | Best Suited For |
|---|---|---|---|
| On-Grid | No | Mandatory | Urban homes with a stable grid connection |
| Off-Grid | Full battery bank | Not applicable | Remote sites without reliable grid access |
| Hybrid | Battery + inverter | Optional, configuration dependent | Areas with frequent power outages |
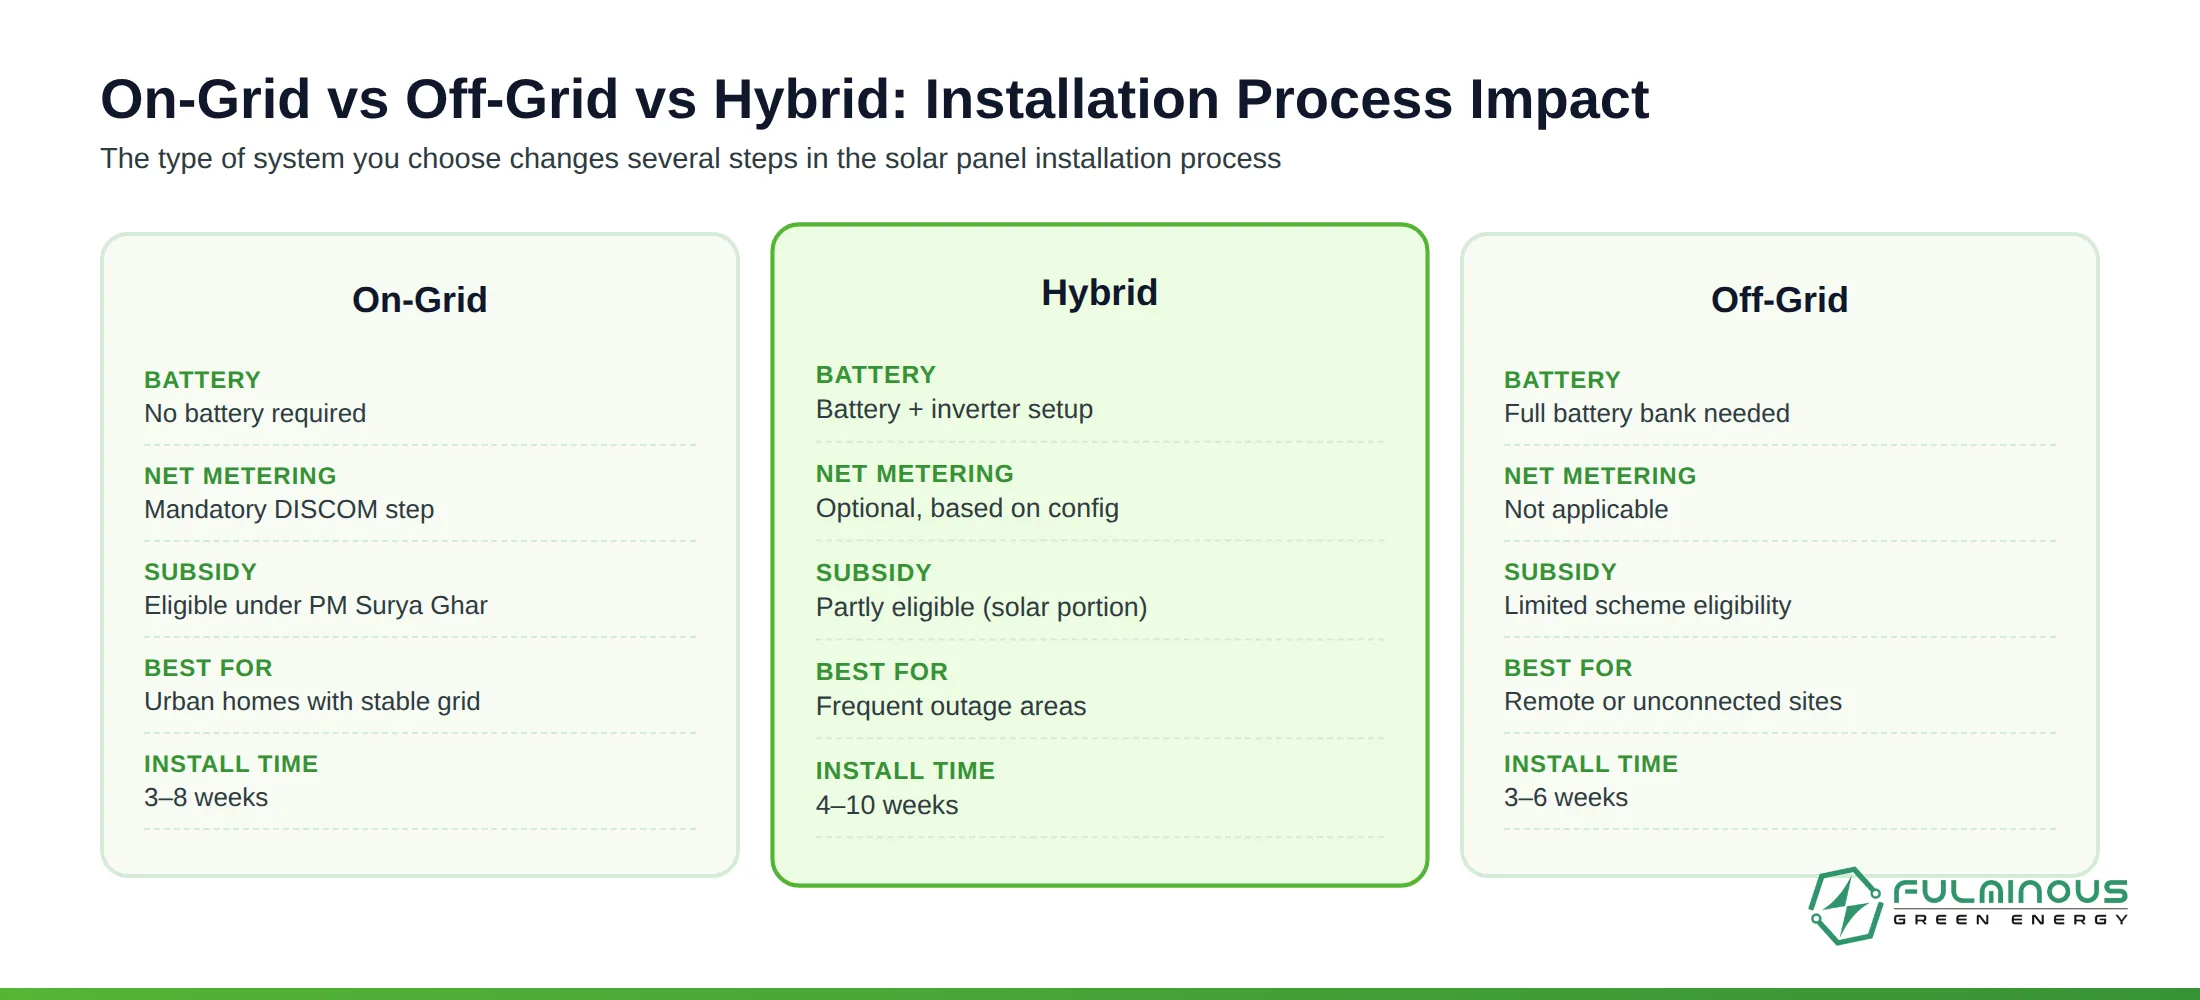
How your choice of system changes the solar panel installation process, 2026.
If you are still deciding which category fits your household, our detailed guide to residential solar solutions compares typical system sizes and configurations for Indian homes in more depth.
Step-by-Step Solar Panel Installation Process: Pre-Installation Stage
The actual solar panel installation process begins well before anyone touches your roof. This pre-installation stage typically takes anywhere from a few days to two weeks and determines how smoothly every later stage of the solar panel installation process will go.
Step 1: Site Survey and Roof Assessment
A qualified technician visits your property to assess roof type, orientation, tilt, and structural strength. For most homes, this first stage of the solar panel installation process takes 30 to 60 minutes and covers shadow mapping between 9 am and 3 pm to identify trees, water tanks, or neighbouring buildings that could reduce output. As a rule of thumb, every kilowatt of capacity needs roughly 100 square feet of usable roof space, and the roof must be able to bear an additional 15 to 20 kilograms per square metre for the full 25-year lifespan of the panels.
Step 2: System Design and Component Selection
Once the survey is complete, the installer prepares a detailed, itemised proposal matched to your monthly electricity consumption. A typical 3kW system, for example, suits a household consuming 300 to 450 units a month. This design stage of the solar panel installation process specifies panel brand and wattage, inverter type, mounting material, cable sizing, and the exact string configuration for your array. It is worth comparing two or three quotations at this stage, since panel quality and inverter brand meaningfully affect long-term performance.
Step 3: Documentation and MNRE-Empanelled Vendor Selection
To remain eligible for subsidy under PM Surya Ghar Yojana, your chosen vendor must be registered on the official national portal. This step involves submitting your electricity consumer number, ID proof, and a copy of a recent electricity bill. Choosing an installer that is not empanelled with MNRE is one of the most common reasons homeowners find their subsidy application rejected later in the solar panel installation process, so this documentation step deserves as much attention as the technical design itself. Fulminous Green Energy handles this paperwork end to end on behalf of every customer, so nothing gets lost between your application and the subsidy portal.
Step-by-Step Solar Panel Installation Process: Installation Day to Commissioning
Once your quotation is approved and roughly 30 to 50% of the payment is made as advance, procurement begins. Standard components typically arrive within three to seven days, after which the physical stages of the solar panel installation process can begin.
Step 4: Mounting Structure Installation
A crew of three to five technicians marks drill points based on the finalised panel layout, then fixes base plates or channel frames onto the roof. For sloped or flat RCC roofs common across Indian homes, the structure is levelled and angled to roughly 10 to 15 degrees of tilt, which is close to optimal for most latitudes in the country. This physical stage of the solar panel installation process usually takes a single day for a typical residential system.
Step 5: Panel Mounting, Wiring and Inverter Setup
Panels are clamped onto the rails and connected in the planned string configuration, after which DC cables are routed from the array to the inverter location. The inverter is mounted in a shaded, ventilated spot, connected to the distribution board, and paired with surge protection devices on both the DC and AC sides. Earthing is completed for the panels, the mounting structure, and the inverter itself, a step in the solar panel installation process that is frequently rushed by inexperienced crews but is critical for electrical safety.
Step 6: Net Metering, DISCOM Approval and Grid Connection
This is usually the longest single stage of the entire solar panel installation process, taking anywhere from two to six weeks depending on your state’s DISCOM. Your installer submits a net metering application along with ID proof, your electricity bill, roof ownership documents, and system specifications. The DISCOM then runs a technical feasibility check on the local transformer and feeder capacity before an inspector visits to confirm the installation matches the submitted application. Once approved, the DISCOM installs a bi-directional meter that records both the power you draw from the grid and the surplus you export back to it.
Step 7: Final Inspection, Commissioning and Subsidy Disbursement
With the bi-directional meter in place, the system is energised and synchronised with the grid. A well-performing 3kW system, for instance, should show a peak output of around 2 to 2.5kW at noon on a clear day. Your installer should hand over warranty cards, the DISCOM approval letter, a commissioning certificate, and a maintenance guide at this final stage of the solar panel installation process. Once commissioning is confirmed on the national portal, your PM Surya Ghar subsidy of up to ₹78,000 is typically credited to your bank account within 30 to 60 days.
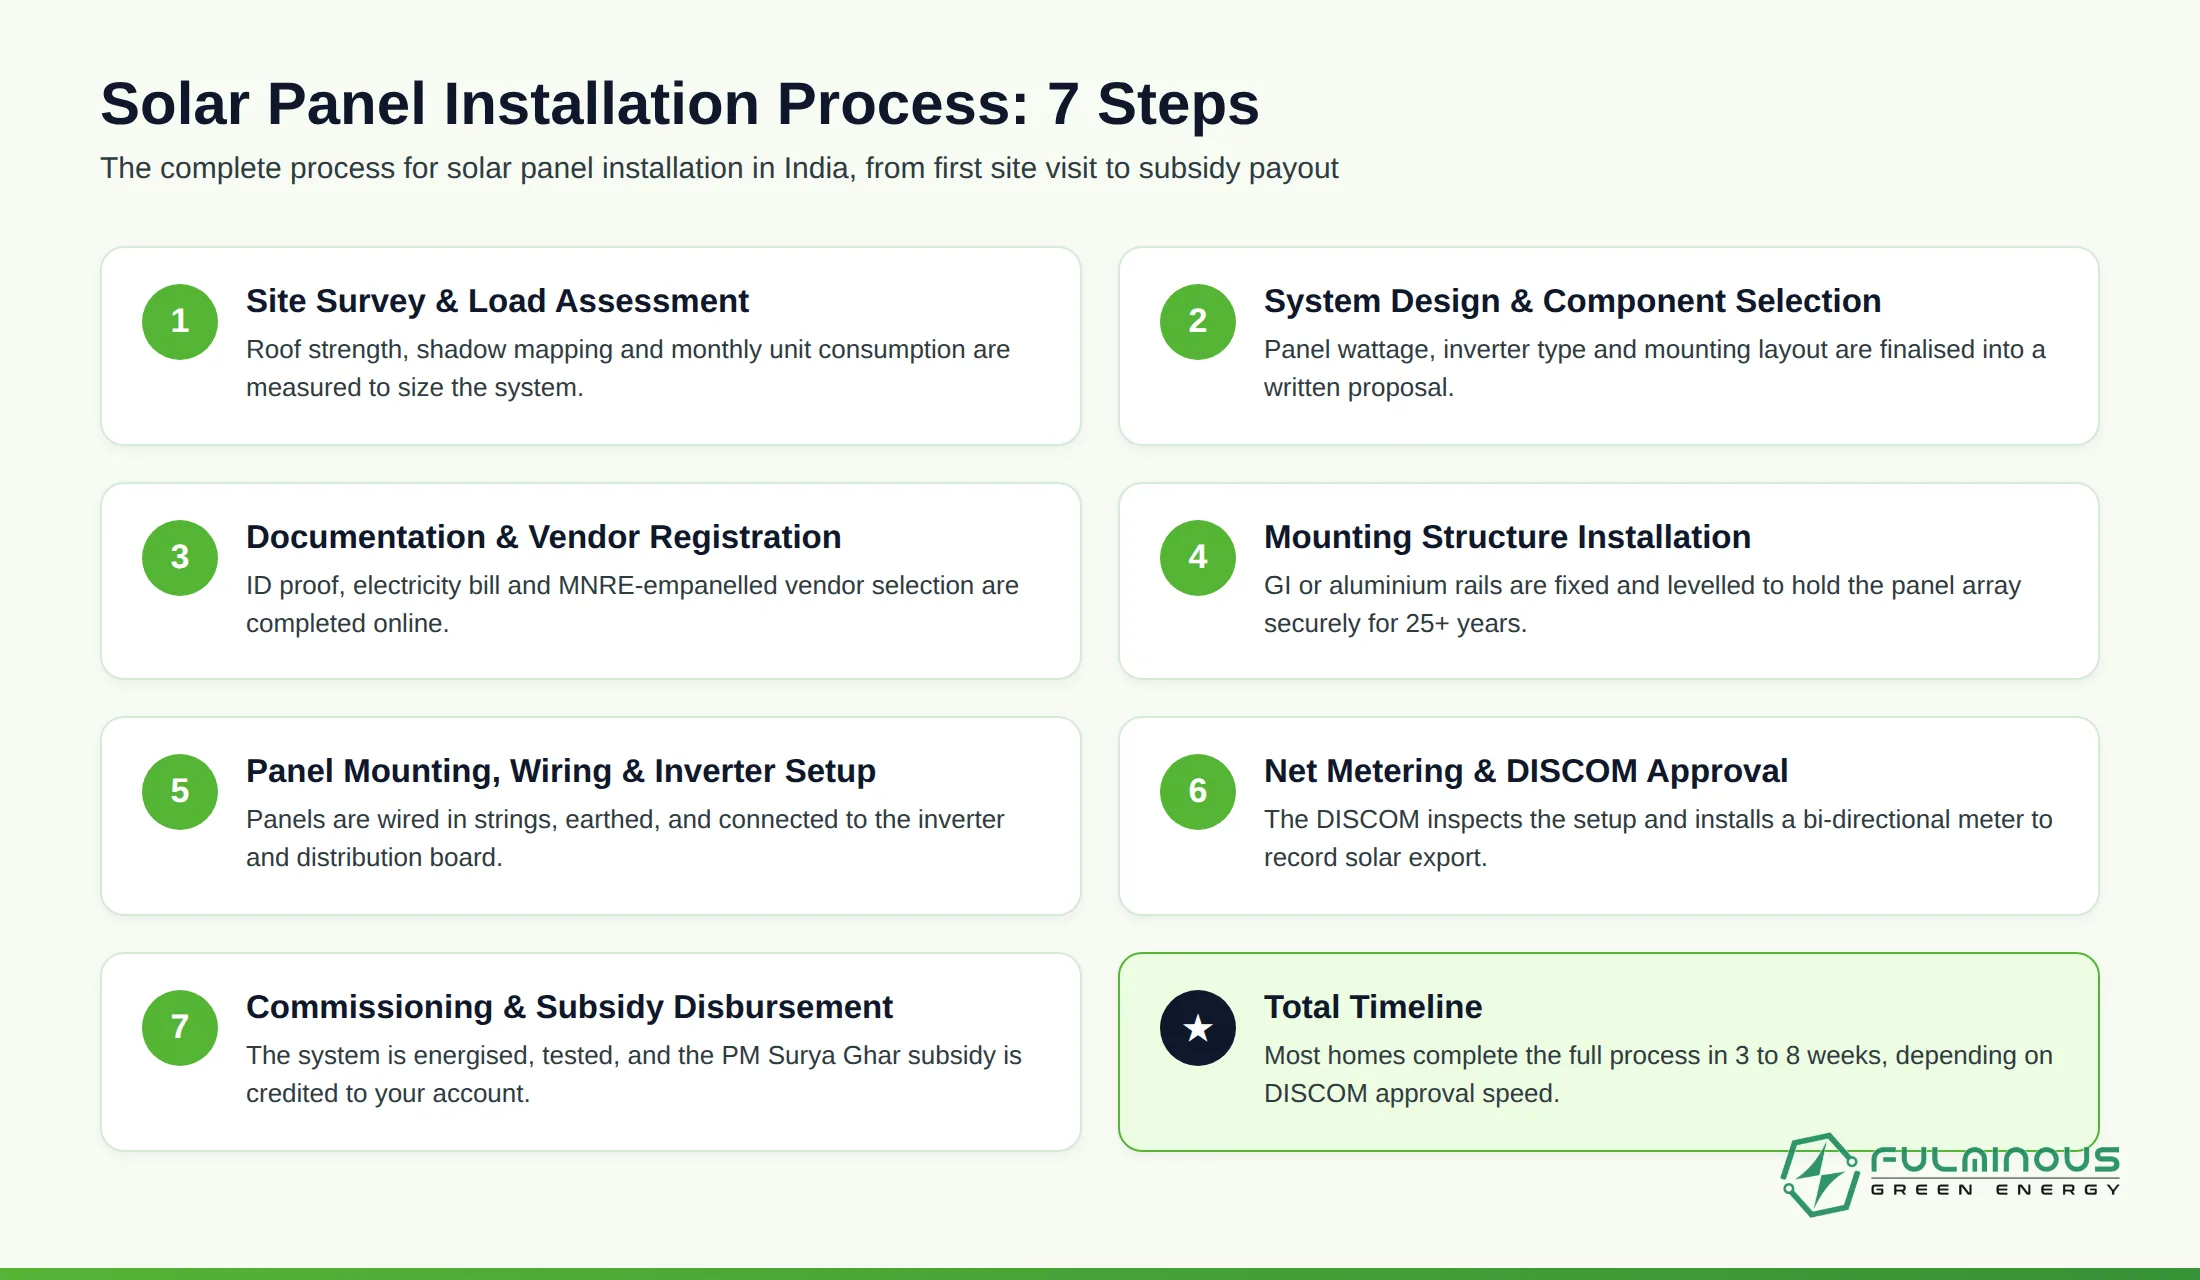
The complete solar panel installation process from site survey to subsidy disbursement.
Process for Solar Panel Installation in India: Documents and Timeline
Because so many different parties are involved, from your installer to your DISCOM to the national subsidy portal, it helps to have every document ready before the process for solar panel installation in India even begins. Missing paperwork is one of the single biggest causes of delay reported by homeowners across the country.
Documents You Will Need
Before your installer submits any application on your behalf, gather the following:
- A recent electricity bill showing your consumer number and sanctioned load.
- Valid ID proof and address proof of the property owner.
- Proof of roof ownership or a no-objection certificate if you are a tenant.
- Bank account details for direct subsidy transfer.
- A signed agreement with your MNRE-empanelled installer, including system specifications.
Typical Installation Timeline by Phase
Most homeowners want a single, honest answer to “how long will this take,” and the truthful response is that it depends heavily on your DISCOM. The table below breaks down what to expect at each phase of the process for solar panel installation in India.
| Phase | Typical Duration | What Happens |
|---|---|---|
| Site survey | 0.5 to 1 day | Roof assessment, shadow mapping, load evaluation |
| Design and quotation | 2 to 3 days | System sizing, component selection, itemised proposal |
| Procurement | 3 to 7 days | Panels, inverter and mounting material sourced |
| Physical installation | 1 to 3 days | Mounting, wiring, inverter and earthing completed |
| Net metering and DISCOM approval | 2 to 6 weeks | Application, feasibility check, inspection, bi-directional meter |
| Commissioning and subsidy | 30 to 60 days | System energised, subsidy credited to your account |
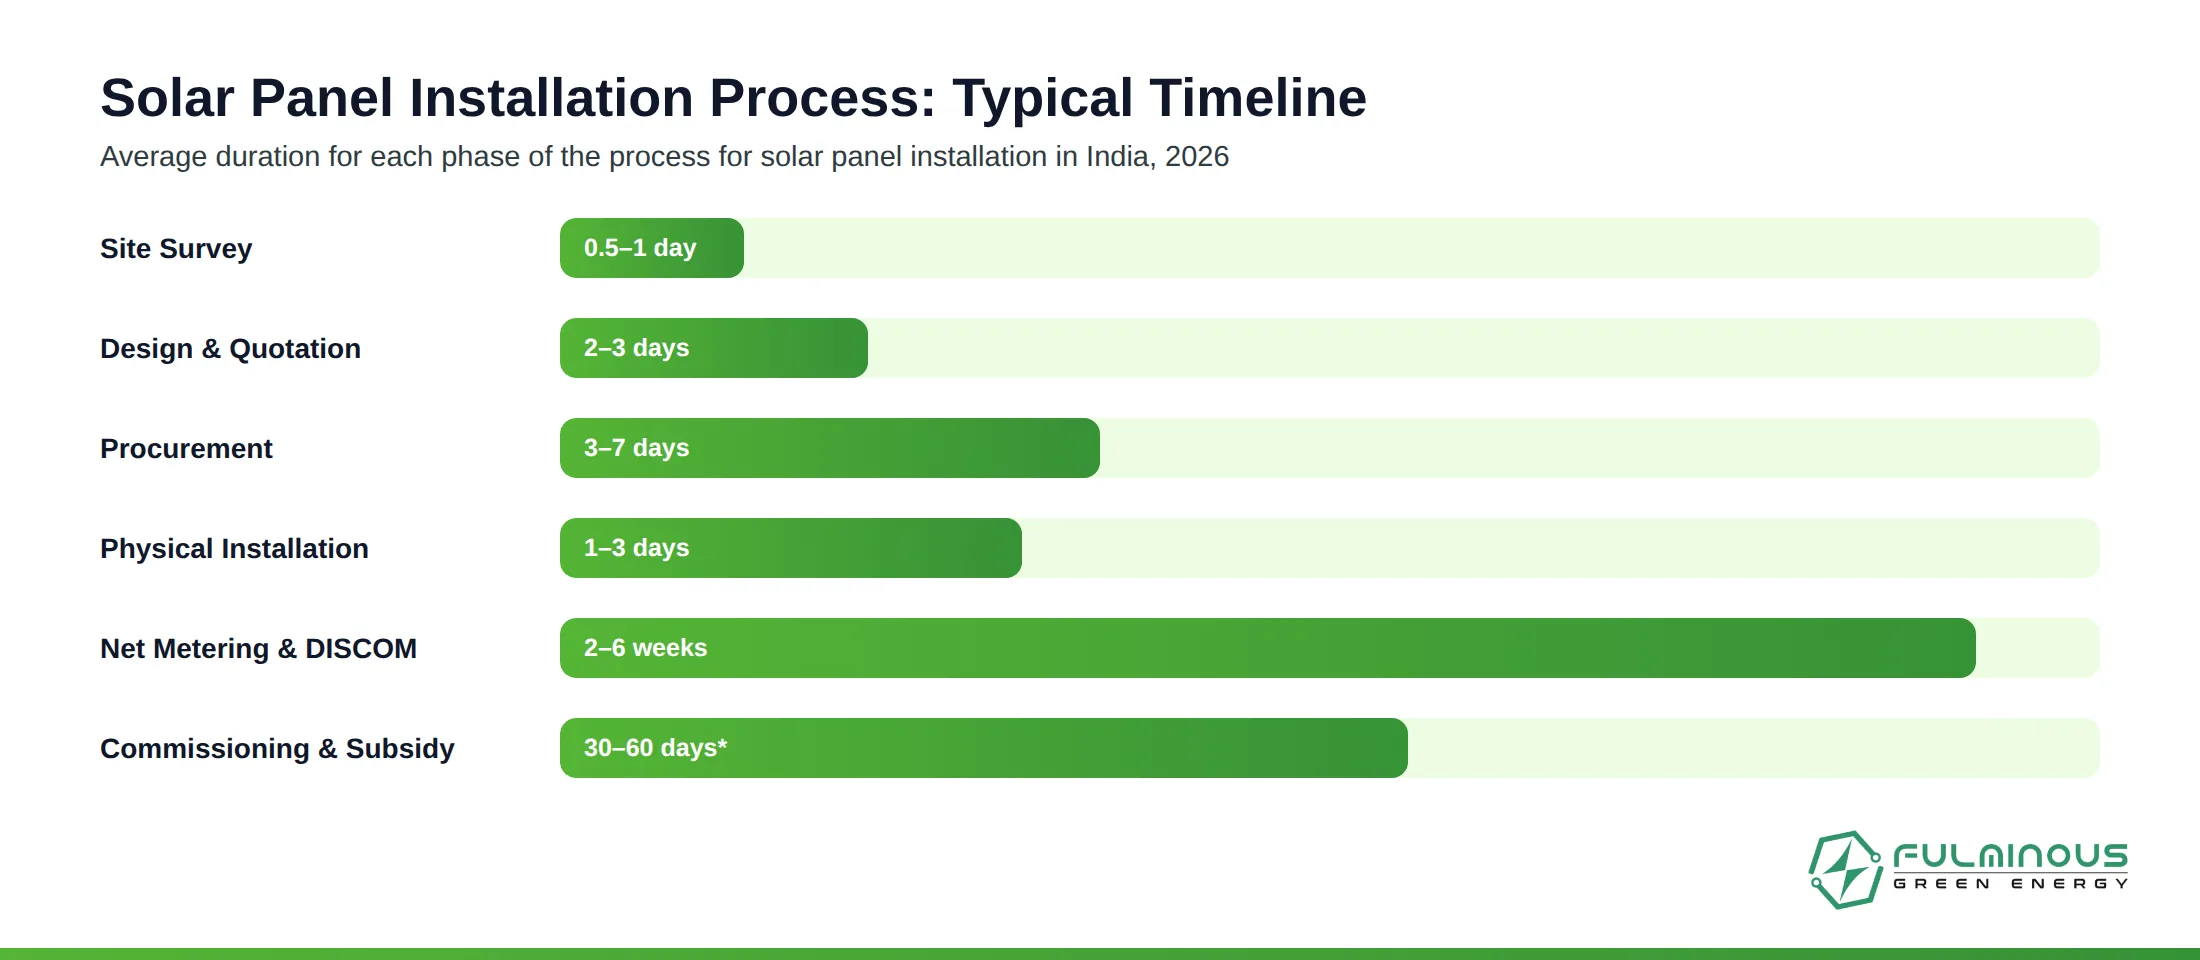
A realistic phase-by-phase timeline for the solar panel installation process in 2026.
Approval speed also varies noticeably by state. Homeowners in Karnataka under BESCOM often see net metering cleared in two to three weeks, Maharashtra’s MSEDCL typically takes three to four weeks, while Delhi’s DISCOMs can take four to six weeks during peak application periods. Checking your state’s state-level rooftop solar subsidies and DISCOM-specific rules before you begin can help you set realistic expectations for your own solar panel installation process from day one.
Cost Factors That Influence the Solar Panel Installation Process
The cost of your system is not just about panel price. Every stage of the solar panel installation process adds its own line item, and understanding this breakdown helps you evaluate quotations more accurately.
Component-Wise Cost Breakdown
Panels typically account for 45 to 55% of total system cost, followed by the inverter at 15 to 20%, mounting structure and cabling at roughly 10 to 15%, and labour plus miscellaneous electrical components making up the remainder. Battery banks, where applicable for hybrid or off-grid systems, add a further 20 to 30% on top of a comparable on-grid quotation. For a full worked example by system size, see our breakdown of the cost of solar panel installation for home systems ranging from 1kW to 10kW.
How the PM Surya Ghar Subsidy Changes Your Net Investment
The central subsidy under PM Surya Ghar Yojana offers up to ₹78,000 depending on system size, which is deducted directly from your net payable amount rather than reimbursed later. Many states layer additional incentives on top of the central subsidy, so your actual out-of-pocket cost can be meaningfully lower than the sticker price quoted before subsidy. Running your specific numbers through a solar ROI calculator before you commit gives you a realistic payback period based on your household’s actual consumption pattern.
Curious how quickly your investment would pay for itself? Get a personalised cost estimate based on your roof, location and electricity usage.
Try the Solar ROI CalculatorDIY vs Professional Installation Process of Solar Panels
With so many tutorials online, some homeowners consider handling parts of the installation process of solar panels themselves to save on labour costs. While mounting a bracket or two might look simple in a video, the reality of Indian electrical codes and subsidy requirements makes this a risky shortcut for most households.
Why Professional Installation Matters
Certified installers carry liability insurance, understand local structural codes, and are trained to size earthing and surge protection correctly for your specific roof and climate. Just as importantly, only an MNRE-empanelled vendor can register your system for the PM Surya Ghar subsidy and process your net metering application, so a fully DIY solar panel installation process automatically forfeits your eligibility for the ₹78,000 central subsidy. Following a professionally managed solar panel installation process from day one is simply the safer, more cost-effective route for most Indian households.
Common Risks of DIY Installation
Beyond the lost subsidy, incorrect DC wiring is a genuine fire hazard, and a mounting structure installed without proper load calculations can fail during high winds or heavy monsoon rain. Warranty coverage from panel and inverter manufacturers is also frequently voided when installation is not performed or certified by an authorised installer, leaving you fully liable for any future repair costs.
Common Mistakes That Delay the Solar Panel Installation Process
Even with a good installer, a handful of avoidable mistakes account for most of the delays homeowners experience. Watching for these can shave real time off your own solar panel installation process.
Choosing Price Over Certification
The cheapest quotation is not always the fastest one. Vendors who cut corners on documentation or use unregistered subcontractors frequently cause the longest delays at the net metering stage of the solar panel installation process, since DISCOMs reject applications from installers who are not properly empanelled.
Skipping the Net Metering Application Early
Some installers wait until physical installation is complete before starting the net metering paperwork. Since this stage of the solar panel installation process already takes two to six weeks on its own, submitting documentation in parallel with procurement and physical installation, wherever your DISCOM allows it, can meaningfully shorten your overall timeline.
A few other patterns worth avoiding during your own solar panel installation process:
- Not confirming your installer’s MNRE empanelment status before signing an agreement.
- Underestimating future electricity needs, such as an upcoming EV purchase, when sizing the system.
- Ignoring shadow mapping and installing panels under partial shade from trees or water tanks.
- Delaying the post-installation solar system maintenance schedule, which protects your output over the full 25-year warranty period.
Already have a system installed and want to keep it performing at its best? Our maintenance plans cover panel cleaning, inverter checks and performance audits.
Explore Maintenance PlansFrequently Asked Questions About Solar Panel Installation Process
How long does the solar panel installation process take in India?
The complete solar panel installation process typically takes 3 to 8 weeks from site survey to commissioning, with net metering and DISCOM approval usually the longest single stage at 2 to 6 weeks depending on your state. Physical installation itself is usually finished within 1 to 3 days.
What are the main steps in the process of installation of solar panels?
The process of installation of solar panels includes site survey, system design and quotation, documentation and vendor registration, mounting structure installation, panel wiring and inverter setup, net metering and DISCOM approval, and final commissioning with subsidy disbursement.
Do I need government approval as part of the installation process for solar panels?
Yes, net metering approval from your local DISCOM is a mandatory part of the installation process for solar panels on any on-grid or hybrid system. This involves a feasibility check, a physical inspection, and installation of a bi-directional meter before your system can legally export power.
Can I do the solar panel installation process myself?
A fully DIY solar panel installation process is not recommended in India, since only MNRE-empanelled vendors can register your system for the PM Surya Ghar subsidy and process net metering paperwork. DIY wiring also carries genuine fire and safety risks and typically voids manufacturer warranties.
What documents are required for the process for solar panel installation in India?
The process for solar panel installation in India requires a recent electricity bill, ID and address proof, roof ownership documents, bank account details for subsidy transfer, and a signed agreement with your MNRE-empanelled installer specifying system details.
Ready to Start Your Solar Panel Installation Process?
The solar panel installation process can feel overwhelming when you are comparing quotations for the first time, but it comes down to a predictable sequence: survey, design, documentation, physical installation, net metering, and commissioning. Choosing an experienced, MNRE-empanelled installer at the very first step is what keeps every stage afterward moving smoothly, protects your eligibility for the PM Surya Ghar subsidy, and ensures your system performs reliably for its full 25-year lifespan.
If you are ready to begin your own solar panel installation process, Fulminous Green Energy’s certified team handles every stage in-house, from the first site survey to subsidy disbursement and long-term maintenance. Contact us today to schedule your free consultation and get a clear, honest timeline for your home.
Ready to get started? Speak with Fulminous Green Energy’s solar experts about your home or business today.
Contact Us TodayRelated Solar Guides
Keep reading — these guides from Fulminous Green Energy go deeper on costs, subsidies and installation.